

No game like Remnant 2 would be complete without a no damage trophy/achievement. These are almost always a stressful task that pushes players to discover creative ways to overcome this challenge. While there are easy paths to get this done, a lot of it will hinge on luck, skill, and tactic, which this guide will help you with.
Remnant 2 Only Human Trophy/Achievement Guide
No Skill Method
Before getting into the guide I wanted to explain the easiest method to obtain it. This tactic is incredibly risky and absurdly cheesy, but can be used to overcome this trophy/achievement with practically no effort.
At the top right you might notice a random number next to the locations name. This signifies the “World Level,” which is a fancy name for scaled difficulty. Basically, if the location is five, it’s scaled for a power level four or five character.
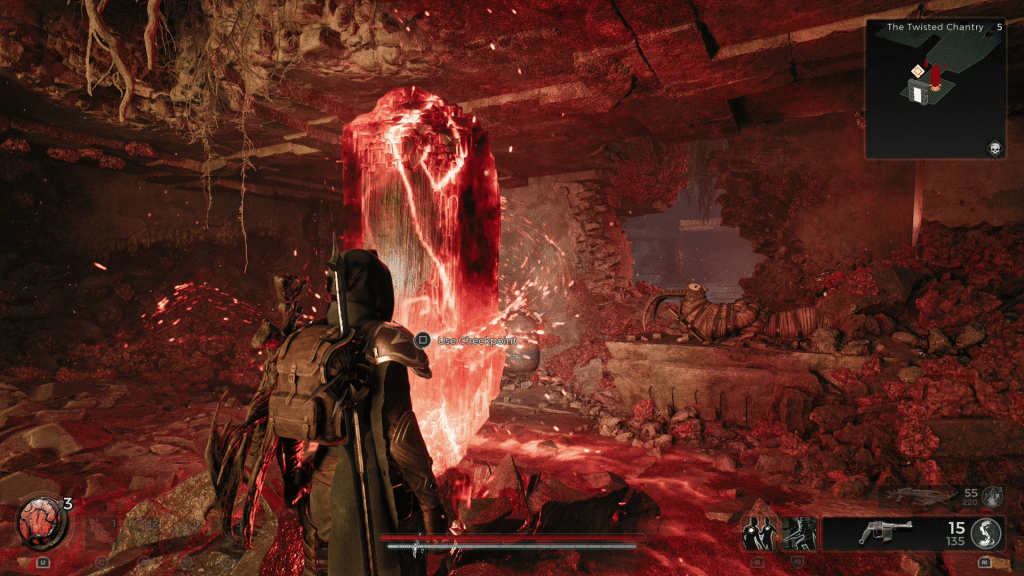
These stages seem to set on a specific level the first time you venture into that location. In the image above The Twisted Chantry is rank five, though my character is power level 20. What you need to do is make a character and explore as many locations at the lowest level possible. This will “lock” them at that point, which you can return to later in your adventure at a much higher power level.
The simplest path to do this is playing in a friend’s world, getting a bunch of crazy resources, and then blasting through levels in your own world. This being said, this method is somewhat high risk. In addition to potentially being patched out or not working in the first place, I made a minor mistake when I inadvertently discovered this.
I took damage from the Legion boss, who is found on The Twisted Chantry, by being visible for too long (it damages you before you fill up the status bar). Normally this wouldn’t be an issue, but my build killed the boss in roughly 3 seconds. All of these attempts are basically one offs since you’ll do enough damage to win even if you don’t want to. So if you go this path make sure you’re certain you’ll not take damage.
Skilled Method
Anyone not looking to cheese this trophy/achievement will need to work on their build and understanding of these bosses. I strongly suggest picking either Legion, Shrewd, or Mother Mind. All three of these bosses appear in the first area and will be detailed since they’re fairly easy to beat. I do not suggest trying with most other bosses as they have cheap mechanics that are incredibly difficult to avoid taking some damage.
I can also confirm adventure mode will unlock the trophy/achievement. So if you don’t get one of the three you can keep rolling.
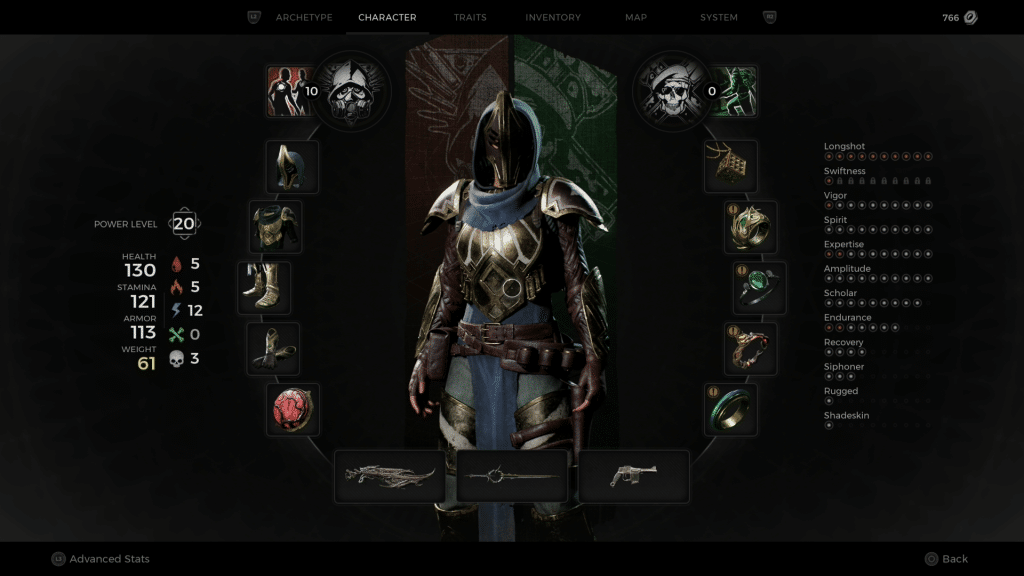
Build
For this I used Firestorm to do the heavy lifting. This is a mod you obtain by killing The Red Prince in the third area. It’s a very hard fight, but well worth it to obtain this mod.
In addition to this, invest all your stats in mod boosting perks. You basically want the mod to do most of the damage and then finish the boss off with a couple hits. Unfortunately, I did not keep track of where all these items are found, but I can confirm some of the best items I have for this tactic are as follows.
- Amulet – Talisman of the Sun
- Ring – Firestone (sold by Reginald)
- Ring – Burden of the Destroyer
- Ring – Stone of Continuance
- Ring – Shard Banded Ring
- Fragment – Solid Mod Duration
- Fragment – Ordinanry Elemental Damage
- Fragment – Cracked Mod Damage
- Trait – Amplitude
- Mutator – Timewave or Harmonizer (Firestorm weapon)
Fighting Legion (The Twisted Chantry)
Start this fight by readying Firestorm and immediately using any damage boosting buffs. Ideally you want to hit the boss with Firestorm so it tracks, but anything in the general area will work.
After this, immediately run to one of the two sides to hide from the boss. While hidden you can kill the two enemies that start with the boss, followed by either attacking the boss or waiting for its wave attack.
Each section will have a set rotation that consists of killing two normal enemies and an exploder, follow by powerful gaze, and the occasional wave attack. It helps to play it safe, but not too safe. The issue is enemies like to spawn near you and it’s incredibly easy for them to get the best of you if this fight goes on too long. Keep it up and you should win without too many issues.
Fighting Shrewd (The Expanding Glaive)
Shrewd is probably the easiest boss for anyone with Souls experience.
Start by readying Firestorm and immediately using any damage boosting skills. Next, shoot the mod near Shrewd, but not on them. This shouldn’t be a problem on the first rotation, though it can be.
What you’ll want to do is decide which tactic works best for you. If you can dodge his exploding arrows it’s best to engage directly. However, if you don’t trust yourself hiding behind the tree will eventually force him to move/engage.
Once enough damage is done he will summon multiple eggs around the arena. Simply shoot each egg and wait for him to return. Failing to get any of these will spawn an enemy that isn’t difficult, but adds needless complications. The number of eggs also increase with the duration of the fight.
After this Shrewd will do his attack rotation. It’s always a large swing that you can avoid by running towards him and dodge rolling through, followed by a three hit combo. Running is enough to avoid being hit by all three. Simply repeat this rotation until he dies.
Please note, if you hit a point where you can do a second Firestorm I would not use it under any circumstance. It’s safe the first time since he should go archer and then eggs. This makes the attack completely safe to use. However, if he goes archer, followed by melee, there is a chance you’ll lock onto him and his teleport will bring Firestorm to you for an instant fail. I can also confirm doing that has the chance to give you credit for the win as well.
Fighting Mother Mind (The Nameless Nest)
Out of the three Mother Mind is the easiest, but also the most skill intensive. Start by determining what you’re comfortable with. This guide will cover using it mid-fight, but if you’re struggling just use it at the start like the other examples.
Unlike the other fights, Mother Mind is about quickly hitting damage gates. She will extend a claw, which can be avoided by a rather quick dodge to the side, followed by doing various attacks over an area. You want to damage her as quickly as possible, something Alpha/Omega does extremely well.
When she goes resist, run to the right onto the next platform and get ready for adds. After she breaks the previous platform two or three enemies will spawn. Kill them quickly, followed by focusing on the boss again. This should, if you do enough damage, by another single attack followed by breaking the platform. Again, just run to the right.
On the third platform you’ll want to use Firestorm towards the end of her animation. If done correctly it will kill the adds while damaging her, though I would still plan on killing them. Hopefully this will continue, which can be repeated a fourth time for the win.
Please note, I actually had her glitch die when I got to the last platform while I was practicing the fight. I do not suggest going to the end unless you’re on a successful run.
In the event none of the information listed here helps, please feel free to comment and I’ll try to assist.
